How To Draft A Summer Dress Pattern
How to Draft a Summer Dress Pattern

Summer is well and truly here and that means one thing for me…lots of summer dress pattern drafting!
This blog post will take you through step by step how to draft a summer dress that is quick, easy and ohhhh so comfy!
We’ll start with our basic bodice block and mark on the new neckline and empire seam line. This will form the basis of our cami style bodice. Then we simply add on a bunch of gorgeous frills and some ties that will create straps and voile! We have a super cool, gorgeous summer dress pattern.
Things to keep in mind about drafting patterns:
We always draft NET. This means we draft without seam allowance and add it at the end.
You always need to tru your lines. This means make sure that all lines are smooth with no corners or nasty angles. It also means that you need to check that all your seams actually fit together and form a nice smooth line/curve once the pieces are next to each other.
Before we start the actual drafting of our summer dress pattern lets take a quick look at the design and do a quick design analysis so that we can plan out our pattern cutting and catch anything that we will need to think about later down the line.
Construction details:
CB invisible zip
I’m only going to line the bodice (the skirt is so voluminous that it won’t need a lining unless your fabric is sheer)
That means the zip will need to be bound on the inside
Bagged out neckline
Double turn or pin hem
Overlock inner seams
Gathers on frills and bust

Design details:
3 frills, each slightly deeper than the one above
Gathers on the top edge of each frill
Tie straps, inserted into top edge
Empire line with gathers under the bust for shaping
Finished length: 85cm from waist
Step 1: Mark your new neckline, empire seam and strap position onto your block with tape.

I usually use design tape for this step and as you can see I tried but then I ran out! I’m super impatient and didn’t want to wait for my new order to arrive so I went a little DIY and sliced up some electrical tape to use instead.
What we’re doing in this step is defining the position of the new neckline, straps and seam details of our summer dress pattern. It’s helpful to do this on your block toile while it’s on the mannequin because it gives us a chance to see the real life proportions before we’ve even made a pattern.
Step 2: Pin in the top edge and the empire line to reduce the risk of gaping and the lower edge to achieve a closer fit.

Our basic bodice block is drafted to skim over the body. It doesn’t contour to every curve so when we create new necklines that go over areas of shaping we have to always think about reducing any extra wearing ease to get the neckline to sit flat against the body and not gape. The same applies to any seams that we want to fit closer to the body.
In this step I’ve pinned out any extra length/ wearing ease where my new neckline runs over the body and some under the bust to ensure that the bodice hugs my under bust snugly.
In a future step, I’ll transfer this shaping onto my pattern and reduce where necessary. I’ll also need to create a third bust dart to reduce my neckline as pinned in the photo above.
Step 3: Measure the positions of your markings and shaping, then transfer them onto your pattern.

Now that we’ve marked up our toile and defined the positions of our seams and new neckline lets measure each lines position and transfer them onto our block paper pattern.
You can either do this by laying your calico over a new copy of your block pattern and using a tracing wheel to trace through each seam or you can measure reference points and transfer these back onto your pattern.
This second option is what I did as the lines are fairly straight forward. The points that I measured are:
New CF & CB neckline position, down from old CF & CB neckline point
New neckline position, down from old underarm point
New CF & CB seam position, up from old CF & CB waist
New seam position, were it intersects waist darts, up from front and back waist
New seam position at side seam, up from old side seam waist position
Front and back strap positions, from new CF & CB neckline
Double check the new CF, CB & SS bodice lengths
Once you’ve marked in your neckline, seams and strap position then you can also mark in the shaping that you pinned out in the previous step. You’ll see that I pinned out a wedge or small dart shape in my front neckline but there’s no existing seam or dart in that area. I’m just going to create a dart to get the shaping that I want for now.
Step 4: Trace your bodice pattern off, rotate all bust shaping into the vertical bust dart and close the back dart. Remember to create strap pieces too!

Trace along the seam, darts and shaping lines that you’ve just marked on to create new pieces.
Back
The back will be traced in 2 pieces because the waist dart separates them. Once you’ve traced them simply join the two pieces together at the seam where the waist dart would have been.
Remember that your grain line will still be parallel to your centre back for this new piece.
Front Darts
The front will be traced with 3 darts because we added one into the neckline. Once you’ve traced the piece, extend the dart tips to the natural bust point. Then rotate the top and the horizontal dart into the lower dart so that you end up with one big dart going into the lower seam.
Step 5: Convert the bust dart into gathers and notch your strap positions

Converting between darts and gathers is easy! We just choose our gather position (in this case I chose to gather to 2cm each side of my dart) and draw in a nice smooth curve to replace the dart lines.
Remember to add your finished gather measurement as an annotation between your gather notches. In this case it would be 4cm because we marked 2cm each side of the dart.
Next we also want to notch in our strap positions and write strap to clearly indicate what the position is!
Remember that the straps for this summer dress are tie straps so they’re just straight pieces inserted into the top edge of the bodice.
Step 6: Define the total skirt length

We already know what our finished length of the dress is (this was defined with our sketch) but now let’s work out our length of the skirt section only because it’ll come into play when we work out our frill depths.
I usually do my lengths by measuring down from the CB waist rather than the back nape because the back neck changes height so often which makes it a hard point to measure from.
This dress is going to be 85cm long down from the waist.
That’s sort of midi length on someone tall so on some my height (5’5″) that’s somewhere between midi and ankle length.
To find my total skirt length I can now measure my CB length up from the waist on my bodice block to the new back seam I’ve just marked on and add this to my 85cm.
85cm + 9cm = 94cm total skirt length
Step 7: Work out your frill lengths & Decide on gather ratios
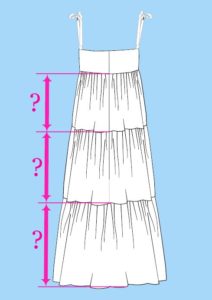
Now that we know our total skirt length we can divide it up to find the length of each frill.
In my sketch the frills get longer as the lower we go. So my top frill will be the shortest and my bottom frill will be the longest.
And I’m going to make each frill 5cm longer than the last.
First I’m going to divide my total skirt length by 3 to find my middle frill length.
94 ÷ 3 = 31.3 (middle frill length)
Next, I’m going to minus 5cm from my middle frill width to find my top frill length.
31.3 – 5 = 26.3 (top frill length)
Then I’m going to plus 5cm to my middle frill width to find my bottom frill length.
31.3 + 5 = 36.3 (bottom frill length)
The last piece of the puzzle the we need is the gather ratio for the frills.
I’m going to go for a 1:2 ratio on each frill. So that means that each time we add a frill it will give twice as much volume as the one before.
Step 8: Work out your frill dimensions
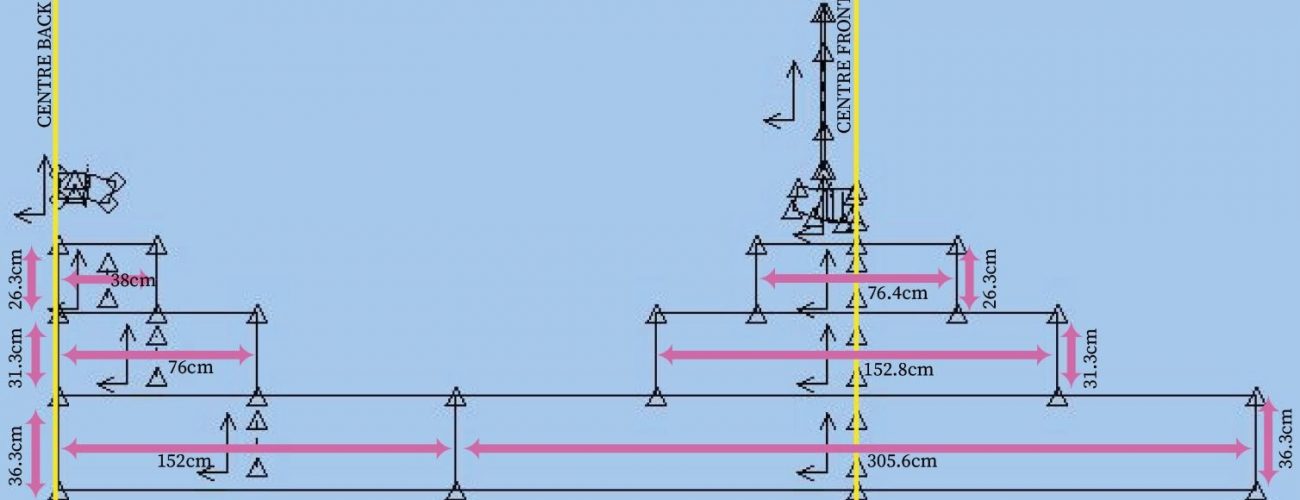
Using our ratio we can now create our frill pieces for our summer dress pattern.
Remember that our dress has no CF seam so we need to work with full measurements for the front. We do have a CB seam for the zip though so let’s work with a half measurement for the back frills.
And each frill will be a rectangle with a gathered top edge and flat bottom edge.
Starting at the under bust seam, I’m going to measure my pattern (remember to measure your finished gather measure at the bust!)
Front (total)= 38.4cm
Back (half) = 19cm
If our flat seams measure as above and we’ve said we want twice as much volume in our frill then all we need to do is multiply our flat measurements by 2 to find our frill width.
Front…38.4 x 2 = 76.4
Back…19 x 2 = 38
Our TOP frill dimensions are:
Front….26.3cm by 76.4cm (cut 1)
Back….26.3cm by 38cm (cut 1 pair)
Now lets repeat this process to find our middle frill dimensions. Lets use our flat length of our top frill as our starting number.
Front…76.4 x 2 = 152.8
Back…38 x 2 =76
Our MIDDLE frill dimensions are:
Front….31.3cm by 152.8cm (cut 1)
Back….31.3cm by 76cm (cut 1 pair)
And lets do it again to find the bottom frill dimensions. Lets use our flat length of our middle frill as our starting number.
Front…152.8 x 2 = 305.6
Back…76 x 2 = 152
Our BOTTOM frill dimensions are:
Front….36.3cm by 305.6cm (cut 1)
Back….36.3cm by 152cm (cut 1 pair)
Step 9: Keeping your fabric width in mind, create your frills
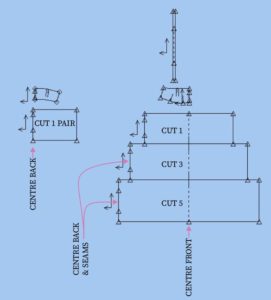
My fabric width is 135cm. In the previous step we worked out our total frill dimensions and they’re way above our fabric width so lets separate the larger ones into multiple smaller pieces that fit our fabric.
Our aim is to create as few pattern pieces as possible while also minimising fabric waste!
Our top frill will be fine as it is, but our middle and bottom frills will need changing.
We could just split all our large frills in half or in 3 but that would leave us with unattractive CF seams and it wouldn’t use the fabric very economically. So instead of thinking about front and back frills lets combine our frill widths for each tier, because that side seam doesn’t need to stay as a seam. We can move it around as much as we need to as long as we don’t get a CF seam and we leave a CB seam where the zip inserts.
Middle frill:
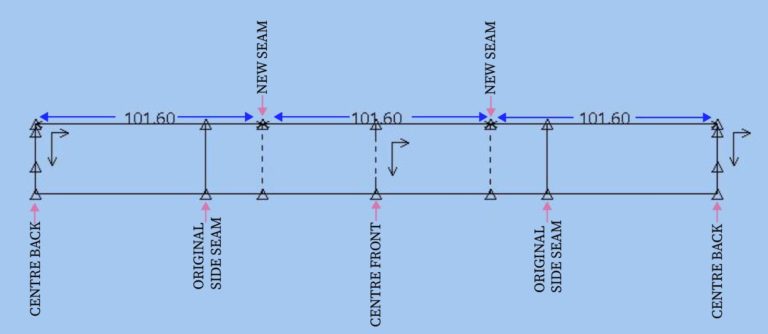
Front….31.3cm by 152.8cm (cut 1) | Back….31.3cm by 76cm (cut 1 pair)
So total frill with is….. 152.8 + 76 + 76 = 304.8
Let’s split it into 3 pieces. That will allow us to have a CB seam and two other evenly spaced seams just in front of the original side seams.
304.8 / 3 = 101.6
That means that our middle frill will be 31.4cm by 101.6cm (cut 3)
Bottom frill:

Front….36.3cm by 305.6cm (cut 1)
Back….36.3cm by 152cm (cut 1 pair)
So total frill with is….. 305.6 + 152 + 152 =609.6
Let’s split it into 5 pieces. That will allow us to have a CB seam and 4 other evenly spaced seams just in front and behind the side seams.
609.6 / 5 = 121.9
That means that our middle frill will be 36.3cm by 121.9cm (cut 5)
Step 10: Create your bodice lining
As I said at the beginning, I’m only going to add a lining to my bodice. So that means my top edge will be bagged out and the lower edge will be overlocked or bound together.
When we bag out a neckline we want a small roll so that the lining doesn’t poke out. So once I’ve traced my pieces I’m going to step back my neckline by 2mm all around.
It’s such a small lining and I’m lining in self so I won’t bother adding any extra length or width.
My centre front is on the fold so I’m also going to open that up now!
Step 11: Add seam allowance, labels, notches etc

We’re basically there, woo! Now lets just add some seam allowance, notches, drill holes and labels.
Remember that we always put the following info on a pattern piece:
Pattern name (Summer Dress)
Piece name (Eg. “Front bodice” etc)
Cut info (how many, what fabric)
Date
Grain line
And remember that you need to write on all your strap positions, gather measurements, zip positions etc.
And that's our summer dress pattern done, happy sewing!
I hope you’ve found this tutorial helpful! If you’ve got any questions or feedback then feel free to pop them in the comments sections below, I love hearing your thoughts!
I also LOVE seeing what you create so if you give this draft a go then send me photos of your dress or tag me on Instagram!
